JWT Token Authentication in WordPress REST API
This article explains a simple method for authenticating users using JWT tokens in a WordPress REST API. It provides an example code for verifying tokens and returning data, along with guidance on securing and handling user access.

This article will explore how to create a custom endpoint in the WordPress REST API. To achieve this, we’ll need a PHP library to help us generate and decode JWT tokens. The library can be found here: Firebase PHP-JWT.
Step 1: Installing the Library
The first step is to install the library using Composer. Run the following command in your project:
composer require firebase/php-jwtIf you’re unfamiliar with how to use Composer in your project, refer to this detailed guide.
Step 2: Creating a Class for the Custom API Namespace
Once the library is installed, we will create a dedicated class to set up a new namespace for our custom API.
Step 3: Registering the Namespace
To create a new namespace, we need to use the rest_api_init action hook:
add_action( 'rest_api_init', [ $this, 'register_new_rest_routes' ] );Step 4: Creating the Function to Register the Routes
Next, we’ll create a handler function that adds the new namespace. Here is the complete code for this function:
/**
 * Register route.
 *
 * @return void
 */
public function register_new_rest_routes(): void {
    register_rest_route(
       self::CUSTOM_API_NAMESPACE,
       '/auth',
       [
          'methods'             => WP_REST_Server::CREATABLE,
          'callback'            => [ $this, 'auth_callback' ],
          'permission_callback' => '__return_true',
          'args'                => [
             'email'    => [
                'type'              => 'string',
                'required'          => true,
                'format'            => 'email',
                'validate_callback' => function ( $param ) {
                   return filter_var( $param, FILTER_VALIDATE_EMAIL );
                },
             ],
             'password' => [
                'type'              => 'string',
                'required'          => true,
                'validate_callback' => function ( $param ) {
                   return filter_var( $param, FILTER_SANITIZE_FULL_SPECIAL_CHARS );
                },
             ],
          ],
       ]
    );

    register_rest_route(
       self::CUSTOM_API_NAMESPACE,
       '/get-posts',
       [
          'methods'             => WP_REST_Server::CREATABLE,
          'callback'            => [ $this, 'get_post_callback' ],
          'permission_callback' => '__return_true',

       ]
    );
}
Code Explanation
The register_rest_route() function registers new endpoints.
- Third parameter: An array of arguments:
- self::CUSTOM_API_NAMESPACE: For simplicity, I stored the namespace name in a constant.
- Second parameter: Defines the endpoint, in this case, ‘auth’, which handles user authentication and returns a generated token.
[
   'methods'             => WP_REST_Server::CREATABLE,
   'callback'            => [ $this, 'auth_callback' ],
   'permission_callback' => '__return_true',
   'args'                => [
      'email'    => [
         'type'              => 'string',
         'required'          => true,
         'format'            => 'email',
         'validate_callback' => function ($param) {
            return filter_var($param, FILTER_VALIDATE_EMAIL);
         },
      ],
      'password' => [
         'type'              => 'string',
         'required'          => true,
         'validate_callback' => function ($param) {
            return filter_var($param, FILTER_SANITIZE_FULL_SPECIAL_CHARS);
         },
      ],
   ],
]- methods: Specifies the HTTP method (GET, POST, PUT, PATCH, DELETE). It’s best practice to use built-in constants from the WP_REST_Server class:
WP_REST_Server::READABLE    // GET
WP_REST_Server::CREATABLE   // POST
WP_REST_Server::EDITABLE    // POST, PUT, PATCH
WP_REST_Server::DELETABLE   // DELETE
WP_REST_Server::ALLMETHODS // GET, POST, PUT, PATCH, DELETE- callback: The function that processes the request and returns data to the user.
- permission_callback: A function that checks the user’s access level. Here, it always returns true.
- args: An array of parameters passed to the API:
- type: Data type (int, string, bool, etc.). Specifying the type is recommended.
- required: Indicates whether the parameter is mandatory.
- format: Additional string format (date-time, uri, email, ip, uuid, hex-color).
- validate_callback: A function to validate incoming data, often used as an anonymous function.
Auth Callback Function
Next, we create the handler function auth_callback, which receives a single parameter—an instance of the WP_REST_Request class containing all requested data.
To access incoming data, use get_json_params(), which returns all parameters as an array. We validate the email to ensure the user exists in the database. If not, we return an error response. This practice, known as early return, enhances server efficiency.
We then create a key for our JWT token, using AUTH_KEY if defined, or a custom constant as a fallback.
Finally, we generate the JWT token using the static function JWT::encode() from the library:
$jwt = JWT::encode(
   [
      'email'    => $params['email'],
      'password' => $params['password'],
   ],
   $key,
   'HS256'
);
You can add extra security measures, such as storing the token in the database or applying further encryption. For more on using the library, visit firebase/php-jwt.
Note: This code is for educational purposes only and is not recommended for use in live projects without additional security measures.
Full Auth Callback Function
/**
 * Auth callback.
 *
 * @param WP_REST_Request $request Params.
 *
 * @return WP_REST_Response
 */
public function auth_callback(WP_REST_Request $request): WP_REST_Response {

    $params = $request->get_json_params();

    if (!email_exists($params['email'])) {
       return new WP_REST_Response(
          [
             'error' => __('User does not exist', 'domain'),
          ],
          403
       );
    }

    $key = defined('AUTH_KEY') ? AUTH_KEY : self::CUSTOM_API_AUTH_KEY_SALT;

    $jwt = JWT::encode(
       [
          'email'    => $params['email'],
          'password' => $params['password'],
       ],
       $key,
       'HS256'
    );

    // ...Additional processing or database storage.

    return new WP_REST_Response(
       [
          'token' => $jwt,
       ],
       200
    );
}
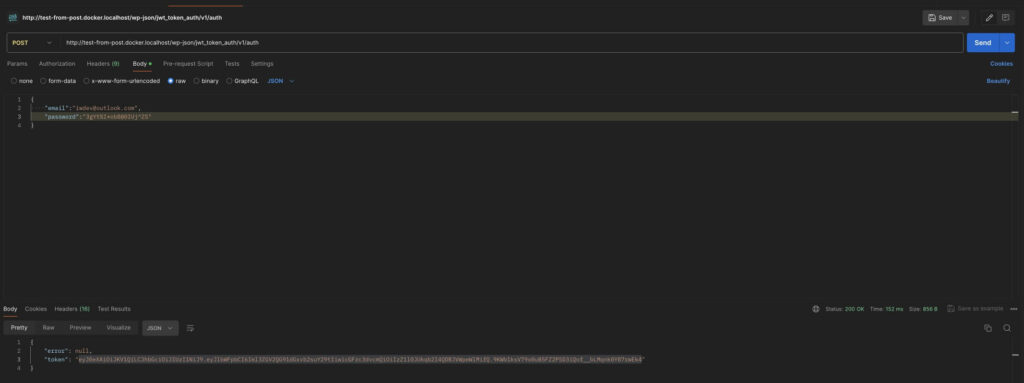
If everything is done correctly, we should get the following response:

Let’s take a look at how we can verify this token and return data if the token is valid. I have registered another endpoint for this purpose and named it get-posts. This endpoint will not accept parameters but will check the presence of our token, and if the token is valid, it will return data.
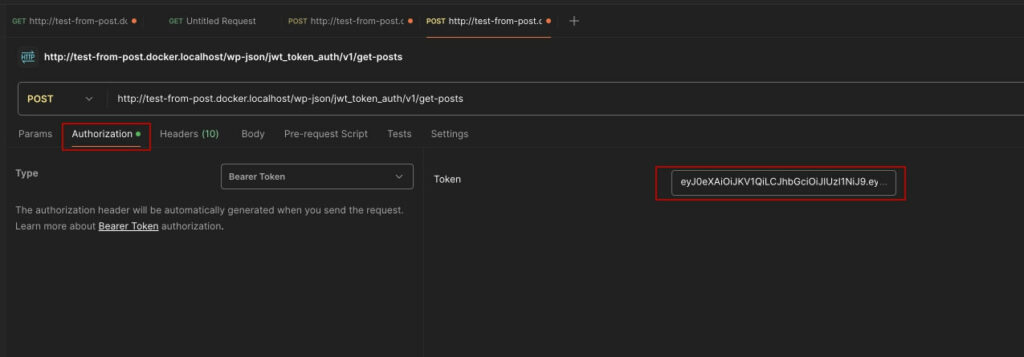
Step by step, let’s review the function handling this request. The first line should retrieve the authorization header with the provided token. To do this, we will use the standard class function get_header(‘authorization’) with the key ‘authorization‘. Here’s an example request in Postman:

I am using Bearer token authentication, which means the header will return not only our token but the string Bearer TOKEN, so we need to remove the “Bearer” part and any extra spaces. For this, we can use str_replace, where we simply replace the first part with an empty string, getting the pure token.
For proper token decryption, we also need the salt we used during generation.
To decrypt the token, we will use the static function JWT::decode. The first parameter is our token, and the second requires creating a new instance of the Key class from the JWT library. We pass two parameters: our salt and the method used for decoding, which in my case is HS256.
If everything matches, we will get the decoded token with our parameters. Next, I use the wp_signon function, which is used for user authentication by providing the username/email, and password, or will return an instance of the WP_Error class if the authentication is unsuccessful.
The next step is to check the response from the wp_signon function. If it returns an error, we immediately return a rejection to the user for data access.
Then, you write the code that is needed for your logic, ensuring the user exists in the system. It would also be good to check their access level before returning any data from your server. Since we are using wp_signon, it should return the full WP_User object, and we will have access to all the data of that class.
Here is the full code of this function:
/**
 * Get some data.
 *
 * @param WP_REST_Request $request Request.
 *
 * @return WP_REST_Response
 */
public function get_post_callback( WP_REST_Request $request ): WP_REST_Response {
    $header_token = $request->get_header( 'authorization' );
    $token        = str_replace( 'Bearer ', '', $header_token );
    $key          = defined( 'AUTH_KEY' ) ? AUTH_KEY : self::CUSTOM_API_AUT_KEY_SALT;

    $decode_token = JWT::decode( $token, new Key( $key, 'HS256' ) );

    $user = wp_signon(
       [
          'user_login'    => $decode_token->email,
          'user_password' => $decode_token->password,
       ],
       false
    );

    if ( is_wp_error( $user ) ) {
       return new WP_REST_Response(
          [
             'error' => __( 'Incorrect access token', 'domain' ),
          ],
          403
       );
    }

    // ... The code that your API returns.

    return new WP_REST_Response(
       [
          'error'    => null,
          'response' => [ 'data' => 'Some data' ],
       ],
       200
    );
}
In this article, we discussed a simple method for authentication and using JWT tokens in your project. This code is created solely as an example and should not be used in a live project.
The full code for this class can be found on my GitHub at this link: https://github.com/alex-l-iwpdev/test-theme/tree/REST-JWT
Conclusion
Integrating JWT token authentication into a WordPress REST API offers a secure and efficient way to manage user access and protect sensitive data. By implementing proper token validation, you can ensure a seamless authentication process and improve the overall security of your API, making it ideal for modern web applications. As security remains a top priority, using JWT with methods like Bearer token authentication ensures that only authorized users can interact with your resources, which is critical for any application handling user data or requiring secure API interactions.
Related posts
Insights and Tips from My Journey

- Category:
- Maintenance
Setting Up GitHub Actions for Automatic WPCS Verification: A Guide for PHP and WordPress
Ready to Take Your Project
to the Next Level?
Let’s bring your vision to life with expert development and custom solutions.
Contact us now and get started on transforming your ideas into reality!

