How to Send Contact Form 7 Submissions to a Telegram Bot
This article explains how to send form submissions from Contact Form 7 directly to a Telegram Bot, enhancing your team’s efficiency in handling client inquiries. Follow the step-by-step guide to set up your bot and integrate it with your WordPress site.

In this article, we’ll explore how to send Contact Form 7 data directly to a Telegram Bot, making it easier for your managers to respond quickly to customer inquiries submitted on your website.
As a first step, you need to create a Telegram bot. To do this, open the Telegram app and locate the official @BotFather channel. Head to @BotFather and follow the instructions to create a new bot.
Once the bot is set up, you’ll receive a message containing an API token, which will be essential for implementing the functionality in your code.

Once the bot is created, go to the bot and activate it by sending the /start command.
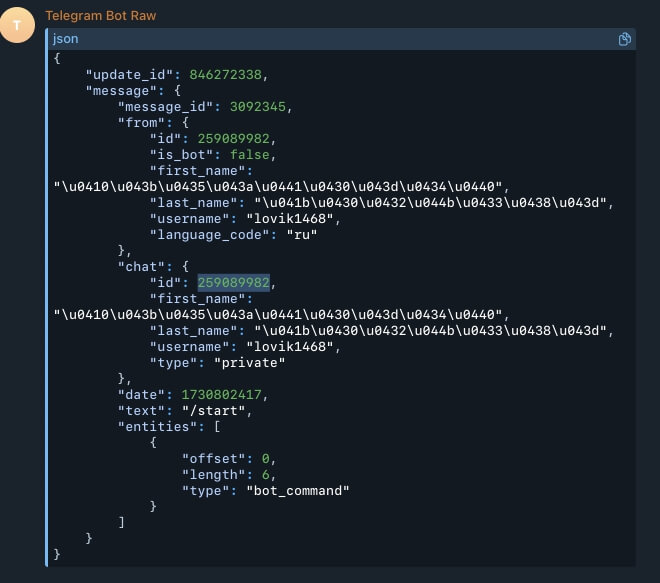
Next, we need to obtain the Chat ID. To do this, find the official bot @RawDataBot, open it, and press Start.
You’ll receive a JSON response with data containing your Chat ID, as shown in the screenshot.

Now, let’s move on to the code. The first step will be to install the GuzzleHttp library, which we’ll use to send data to Telegram. You can find the installation and usage instructions here.
Alternatively, you can replace GuzzleHttp with WordPress’s native functions, like wp_remote_get() or wp_remote_post(), or use PHP’s built-in cURL functions for making HTTP requests directly.
These options allow you to send requests to the Telegram API without needing an external library, keeping the code lightweight and well-integrated with WordPress.
Create a Main.php class and register the wpcf7_before_send_mail action, which will trigger before the form sends an email.
In this code, first get the form instance, then retrieve the form data, which we will send to a new class created specifically for sending data to Telegram.
<?php
/**
 * Main theme class.
 *
 * @package iwpdev/test-theme
 */

namespace TestTheme;

use WPCF7_ContactForm;
use WPCF7_Submission;

/**
 * Main class file.
 */
class Main {
	/**
	 * Main construct.
	 */
	public function __construct() {
		$this->init();
	}

	/**
	 * Init actions and filter.
	 *
	 * @return void
	 */
	public function init(): void {
		add_action( 'wpcf7_before_send_mail', [ $this, 'mail_send_to_tg' ] );
	}

	/**
	 * Mail send to TG.
	 *
	 * @param WPCF7_ContactForm $wpcf7 Contact form 7 form instance.
	 *
	 * @return void
	 */
	public function mail_send_to_tg( WPCF7_ContactForm $wpcf7 ) {
		// get the form instance.
		$submission = WPCF7_Submission::get_instance();

		// get data from the form.
		$posted_data = $submission->get_posted_data();

		// Class that sends data from the form to the telegram bot.
		$message_send = TelegramSender::send_to_tg_chanel( $posted_data );

		if ( isset( $message_send['error'] ) ) {
			$wpcf7->set_properties(
				[
					'messages' => [
						'validation_error' => 'An error occurred while submitting the form. Please check the entered data.',
					],
				]
			);

			// Set the error flag.
			add_filter(
				'wpcf7_validate',
				function ( $result ) {
					$result->invalidate( null, 'An error occurred while submitting the form.' );

					return $result;
				}
			);
		}
	}
}
Create a class for sending data to Telegram, where we define the variables TELEGRAM_TOKEN (the API token we received from @BotFather when creating the bot) and TELEGRAM_CHAT_ID, which we obtained in @RawDataBot as one of the parameters in the JSON response.
<?php
/**
 * Telegram sender class.
 *
 * @package iwpdev/test-theme
 */

namespace TestTheme;

use GuzzleHttp\Client;

/**
 * TelegramSender class file.
 */
class TelegramSender {

	/**
	 * Telegram token
	 */
	const TELEGRAM_TOKEN = 'YOUR TELEGRAM TOKEN';

	/**
	 * Telegram chat id.
	 */
	const TELEGRAM_CHAT_ID = 'YOUR CHAT ID';

	/**
	 * Telegram API base url.
	 */
	const TELEGRAM_API_BASE_URL = 'https://api.telegram.org';

	/**
	 * Send to tg chanel.
	 *
	 * @param array $data From data.
	 *
	 * @return array|true[]
	 */
	public static function send_to_tg_chanel( $data ) {

		// Create an http client with base url settings.
		$client = new Client(
			[
				'base_uri' => self::TELEGRAM_API_BASE_URL,
			]
		);

		// A function that will convert form data into Markdown text.
		$markdown_data = self::data_markdown_text_by_form_data( $data );

		// Sending data to Telegram bot.
		$response = $client->request(
			'GET',
			'/bot' . self::TELEGRAM_TOKEN . '/sendMessage',
			[
				'query' => [
					'chat_id'    => self::TELEGRAM_CHAT_ID,
					'text'       => $markdown_data,
					'parse_mode' => 'Markdown',
				],
			]
		);

		// Receive a response from the API.
		$body     = $response->getBody();
		$arr_body = json_decode( $body, false, 512, JSON_THROW_ON_ERROR );

		// If you get a good answer.
		if ( $arr_body->ok ) {
			return [ 'success' => true ];
		}

		// Received an error in response.
		return [ 'error' => $arr_body ];
	}

	/**
	 * Data markdown text by form data.
	 *
	 * @param array $data Form data array.
	 *
	 * @return string
	 */
	private static function data_markdown_text_by_form_data( array $data ): string {
		$markdown_text = '';

		if ( empty( $data ) ) {
			return '';
		}

		foreach ( $data as $key => $value ) {
			switch ( $key ) {
				// Input name.
				case 'your-name':
					$markdown_text .= '* Name:' . $value . '* ' . "\n";
					break;
				case 'your-email':
					$markdown_text .= '* Email:' . $value . '* ' . "\n";
					break;
				case 'your-subject':
					$markdown_text .= '* Email Subject:' . $value . '* ' . "\n";
					break;
				case 'your-message':
					$markdown_text .= '* Message:' . $value . '* ' . "\n";
					break;
			}
		}

		return $markdown_text;
	}
}
Conclusion:
I hope this code and tutorial will help your business process form submissions from your website more efficiently. The full version of the code can be found here
Related posts
Insights and Tips from My Journey

- Category:
- Maintenance
Setting Up GitHub Actions for Automatic WPCS Verification: A Guide for PHP and WordPress
Ready to Take Your Project
to the Next Level?
Let’s bring your vision to life with expert development and custom solutions.
Contact us now and get started on transforming your ideas into reality!

