Development environment Docker, Composer, PSR-4, WP
The article shows how to set up a WordPress development environment using Docker, Composer, and PSR-4 for autoloading classes. It also explains configuring PHP_CodeSniffer for WordPress standards and building a plugin with Composer.

Good afternoon, today I started my YouTube channel and a series of videos on creating a plugin for WordPress.
What will our plugin do in the future?
It will create an opportunity to turn your site into an entire car dealership.
The first video is about how I set up the Development Environment.
So, let’s begin!
The first thing we need to go to the site https://www.docker.com/ download and install it on your computer.
For the next step, we need to globally install Composer, we need it to automatically import our future classes according to the PSR-4 standard (you can read about this standard here https://www.php-fig.org/psr/psr-4/ ).
To download and install Composer, follow the instructions on the official website https://getcomposer.org/doc/00-intro.md, we need a global installation.
And so the next step we need to clone the Docker image repository https://github.com/wodby/docker4wordpress
You may have problems with it because it refused to work for me on Mac OS so I had to change it a little if you are facing the same problem clone my version from this link https://gitlab.com/AlsconWeb/wordpress-dev- environment-docker
And so all the preparations for the start are over and we can start!
Go to the project folder in my case it is car-listing and copies the following files there from the repository above
- .env
- docker.mk
- docker-compose.yml
- Makefile
- docker
Now we need to set up .env
To do this, we need to change the following parameters
PROJECT_NAME - responsible for the name of the project in docker
PROJECT_BASE_URL - Url where our site will be available in my case carlisting.docker.localhost

DB_NAME - the name of the created database (I make it by the name of the project)
DB_USER - database username (I make it by project name)
DB_PASSWORD - database password (I make it by project name)
I also change the PHP version from the default 7.4 to 8.0
PHP_TAG=8.0-dev-macos-4.22.2Now we need to go to this folder and execute the make command and wait until the command is executed all the images will affect and connect
Next, we need to download WP for this, we just need to execute the make wp core download command – this is the standard wp-cli command, but we need to execute it with the make command so that the docker understands that it needs to install the image.
We execute and wait for the command to be executed.
The next step we need to go to the app folder and change the filename wp-config-sampel.php to wp-config.php
Open it for editing
And set the database accesses that you configured in the .env file
The main point in the need to change
define( 'DB_HOST', 'localhost' );to
define( 'DB_HOST', 'mariadb' );‘mariadb’ is the name of the docker container.
Next, we generate keys for the site https://api.wordpress.org/secret-key/1.1/salt/
paste them further standard WordPress installation
The next step is to create our plugin folder in /wp-content/plugins folder, I named it ease-car-listing.
Composer settings
And so now we need to initialize composer for this we execute the composer init command and answer or skip all the questions that he asks us.
As a result of executing this command, we should have a composer.json file
Open it for editing and add the required information
"description": "Ease car listing for your site",
"license": "GPL-2.0-only",
Add a description and type of license
"homepage": "https://i-wp-dev.com/", //package homepage
"type": "wordpress-plugin", // package type (if it's a plugin) or wordpress-theme if it's a theme
support: {
     "issues": https://i-wp-dev.com/ // url where you can leave comments
},
"prefer-stable": true,
"config": {
// tells composer which PHP version to run dependencies and project on
     platform: {
         "php": "7.4"
     }
},
The main block for automatically loading our project’s classes
"autoload": {
     "psr-4": {
         "Iwpdev\\EaseCarListing\\": "src/php" //This means that all our classes will be in the src/php folder
     }
},
The minimum stable version I usually set it to dev
"minimum-stability": "dev",Next, we have development dependencies, this is a very important block for PHP_CodeSniffer to work.
"require-dev": {
    "roave/security-advisories": "dev-latest",
    "squizlabs/php_codesniffer": "^3.6",
    "phpcompatibility/php-compatibility": "^9.3",
    "phpcompatibility/phpcompatibility-wp": "^2.1",
    "wp-coding-standards/wpcs": "^2.3",
    "php-coveralls/php-coveralls": "^2.4"
}
Here is what I got the complete composer.json code
{
    "name": "iwpdev/ease-car-listing",
    "description": "Ease car listing for your site",
    "license": "GPL-2.0-only",
    "keywords": [
        "ease",
        "car",
        "listing",
        "car listing",
        "ease car listing",
        "ukrane product"
    ],
    "homepage": "https://i-wp-dev.com/",
    "type": "wordpress-plugin",
    "support": {
        "issues": "https://i-wp-dev.com/"
    },
    "prefer-stable": true,
    "config": {
        "platform": {
            "php": "7.4"
        }
    },
    "autoload": {
        "psr-4": {
            "Iwpdev\\EaseCarListing\\": "src/php"
        }
    },
    "authors": [
        {
            "name": "iwpdev",
            "email": "iw****@*****ok.com"
        }
    ],
    "minimum-stability": "dev",
    "require": {
        "htmlburger/carbon-fields": "^3.3"
    },
    "require-dev": {
        "roave/security-advisories": "dev-latest",
        "squizlabs/php_codesniffer": "^3.6",
        "phpcompatibility/php-compatibility": "^9.3",
        "phpcompatibility/phpcompatibility-wp": "^2.1",
        "wp-coding-standards/wpcs": "^2.3",
        "php-coveralls/php-coveralls": "^2.4"
    }
}
Add dependency data and execute composer update command.
Setting up PHP Storm
Next, we go to the PHP_CodeSniffer settings, open the PHP Storm settings, go to Preferences | PHP | Quality Tools open PHP_CodeSniffer click on the ellipsis in the PHP_CodeSniffer path settings we must add a file that is located /vendor/bin/phpcs (in the case of Windows it will be a file with a bat extension)
We click on the validate button and we should get the result on my screen
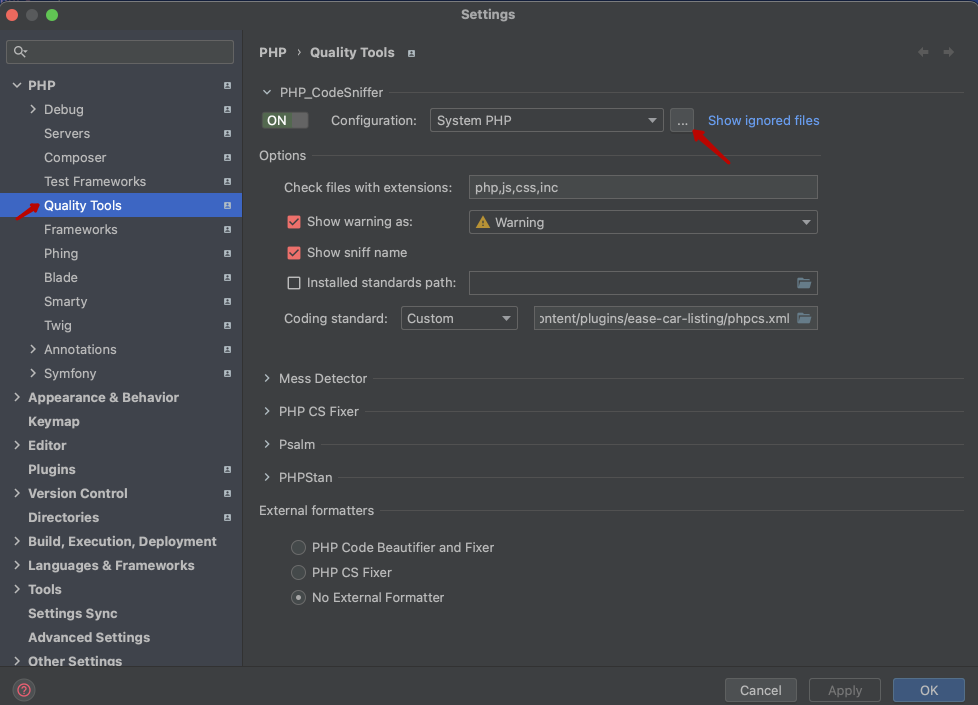
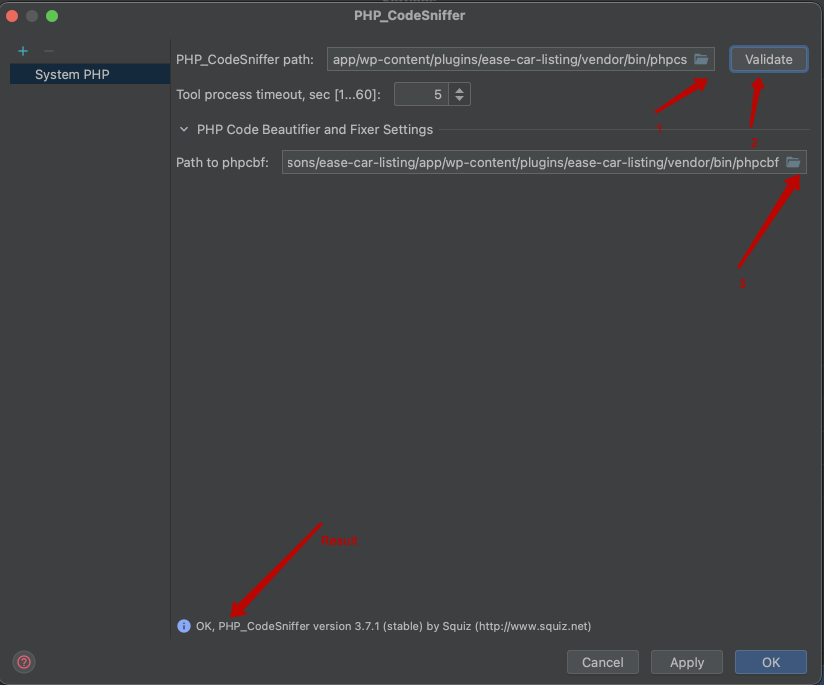
If you see a similar result we can move on to the next step.
Now we need to add a file that will be responsible for autocorrection.
It is located a little lower in the Path to phpcbf field and we select this file in the same cape
We save and return to the settings now we need to select the standard code.
I use a custom one that my friend gave me and this standard is used in many large studios that develop WordPress
In the Coding standard, I choose custom and I specify the path to this file, which I copied to the root of the plugin in advance. You can find this file at this link https://codeshare.io/oQYERp this field we just save the settings.
And so we got to the code itself.
Main plugin file
I created the main plugin file where the plugin itself will be initialized
He looks like this
<?php
/**
 * Ease Car Listing.
 *
 * @package           iwpdev/ease-car-listing
 * @author            Alex Lavyhin
 * @license           GPL-2.0-or-later
 * @wordpress-plugin
 *
 * Plugin Name: Ease Car Listing.
 * Plugin URI: https://i-wp-dev.com
 * Description: Ease car listing for your site
 * Version: 1.0.0
 * Author: ALex Lavyhin
 * Author URI: https://i-wp-dev.com
 * License: GPL2
 *
 * Text Domain: key-crm-synchronization
 * Domain Path: /languages
 */

if ( ! defined( 'ABSPATH' ) ) {
	// @codeCoverageIgnoreStart
	exit;
	// @codeCoverageIgnoreEnd
}

use Iwpdev\EaseCarListing\Admin\Notification\Notification;
use Iwpdev\EaseCarListing\Main;


/**
 * Plugin version.
 */
const ECL_VERSION = '1.0.0';

/**
 * Plugin path.
 */
const ECL_PATH = __DIR__;

/**
 * Plugin main file
 */
const ECL_FILE = __FILE__;

/**
 * Min ver php.
 */
const ECL_PHP_REQUIRED_VERSION = '7.4';

/**
 * Plugin url.
 */
define( 'ECL_URL', untrailingslashit( plugin_dir_url( ECL_FILE ) ) );

/**
 * Check php version.
 *
 * @return bool
 * @noinspection ConstantCanBeUsedInspection
 */
function is_php_version(): bool {
	if ( version_compare( constant( 'KEY_CRM_SYNCHRONIZATION_PATH' ), phpversion(), '>' ) ) {
		return false;
	}

	return true;
}

if ( ! is_php_version() ) {

	add_action( 'admin_notices', [ Notification::class, 'php_version_nope' ] );

	if ( is_plugin_active( plugin_basename( constant( 'ECL_FILE' ) ) ) ) {
		deactivate_plugins( plugin_basename( constant( 'ECL_FILE' ) ) );
		// phpcs:disable WordPress.Security.NonceVerification.Recommended
		if ( isset( $_GET['activate'] ) ) {
			unset( $_GET['activate'] );
		}
	}

	return;
}


require_once ECL_FILE . '/vendor/autoload.php';

new Main();
Carbon Fields class
I also created a class for managing Carbone Fields, but this is just a blank that we will do in the next video and article
/**
 * Add Custom fields in project.
 *
 * @package iwpdev/ease-car-listing
 */

namespace Iwpdev\EaseCarListing;

/**
 * CarboneFields class file.
 */
class CarboneFields {

	/**
	 * CarboneFields construct.
	 */
	public function __construct() {
		$this->init();
	}

	/**
	 * Init hooks.
	 *
	 * @return void
	 */
	private function init(): void {

	}
}
AddCPT class
And I created a blank for creating a Custom post type
/**
 * Create Custom post type.
 *
 * @package iwpdev/ease-car-listing
 */

namespace Iwpdev\EaseCarListing\CPT;

/**
 * AddCPT class file.
 */
class AddCPT {
	/**
	 * AddCPT construct
	 */
	public function __construct() {
		$this->init();
	}

	/**
	 * Init hooks.
	 *
	 * @return void
	 */
	private function init(): void {

	}
}
This is what my project tree looks like now
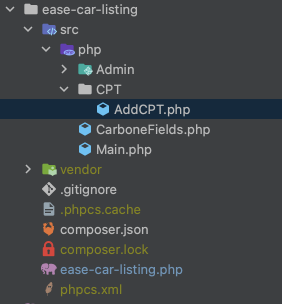
Also, watch the video on this topic on my channel!
Thank you for reading this article to the end, I hope it has become useful for you, and subscribe to my channel soon there will be a lot of interesting things
Related posts
Insights and Tips from My Journey
- Category:
- Maintenance
Setting Up GitHub Actions for Automatic WPCS Verification: A Guide for PHP and WordPress

Ready to Take Your Project
to the Next Level?
Let’s bring your vision to life with expert development and custom solutions.
Contact us now and get started on transforming your ideas into reality!